Today, most of the apps and phones come in handy with dark mode feature. And why they won't ? Night mode offers two impactful merits over normal light mode : 1) This mode cuts the amount of light entering your eyes, minimizing eye strain and maybe help you get a better sleep. 2) Also, uses less light, and thereby consuming less power.
The same dark mode trend has been skyrocketing in website designs nowadays. This makes a website more accessible and easier to read during low lights. Who do not want convenience in their eyes while reading? Imagine reading an article in an iPad at 12am with normal mode, the light it emits and all those ... -- it hurts my eyes even by thinking. I detest the normal mode the same way vampires detest sunlight.
To conclude, in short, we have even reached a point where dark mode is so omnipresent, websites that don't have it seem like they are pointing flashlights to our eyes by comparison. You can read more on dark mode from here.
Dark mode is essential element of a website and in this article, I'll be showing you some easy steps on how to add night mode or dark mode in blogger blogs. You can check the live demo of how dark mode works in our website (it is in the menu bar).
UPDATE: Check this perfect dark mode for blogger with pure Javascript
Here's a quick video on "Why is Everyone Switching To Dark Mode":
How to Add Night/Dark Mode To My Blogger Wesbite
The very first step in creating a dark mode is to add HTML script in your blogger. This section will help in adding an icon in your blog. Go To Theme > Edit HTML and Search for
</head> or </head><!--<head/>--> and paste the following code above it. And yea don't forget to backup your whole blog before proceeding.<div class='modedark'><input class='check' id='modedark' title='Mode Dark' type='checkbox'/>
<label class='iconmode' for='modedark'>
<svg class='openmode' viewBox='0 0 24 24'><path d='M12,18C11.11,18 10.26,17.8 9.5,17.45C11.56,16.5 13,14.42 13,12C13,9.58 11.56,7.5 9.5,6.55C10.26,6.2 11.11,6 12,6A6,6 0 0,1 18,12A6,6 0 0,1 12,18M20,8.69V4H15.31L12,0.69L8.69,4H4V8.69L0.69,12L4,15.31V20H8.69L12,23.31L15.31,20H20V15.31L23.31,12L20,8.69Z'/></svg>
<svg class='closemode' viewBox='0 0 24 24'><path d='M14.3,16L13.6,14H10.4L9.7,16H7.8L11,7H13L16.2,16H14.3M20,8.69V4H15.31L12,0.69L8.69,4H4V8.69L0.69,12L4,15.31V20H8.69L12,23.31L15.31,20H20V15.31L23.31,12L20,8.69M10.85,12.65H13.15L12,9L10.85,12.65Z'/></svg>
</label>
</div>
Now we will call our Jquery script for night mode. Search for
</body> or <!--</body> and insert the given code above it.<script type='text/javascript'>
//<![CDATA[
/* Night Mode/Dark Mode Feature - By TwistBlogg.com */
/* Keep the Credit Intact */
$(document).ready(function(){$("body").toggleClass(localStorage.toggled),$("#modedark").on("click",function(){"nightmode"!=localStorage.toggled?($("body").toggleClass("nightmode",!0),localStorage.toggled="nightmode",$(".section-center").css("display","block")):($("body").toggleClass("nightmode",!1),localStorage.toggled="",$(".section-center").css("display",""))}),$("body").hasClass("nightmode")?$("#modedark").prop("checked",!0):$("#modedark").prop("checked",!1)});
//]]>
</script>
Oops, I forgot to mention that you need Jquery file installed in your blog. Most of the templates have it by default, if not, add the below script above
</head> or </head><!--<head/>--> and hit save button.<script src='//ajax.googleapis.com/ajax/libs/jquery/3.4.1/jquery.min.js'></script>
You might be wondering where's the CSS part for adding dark mode in blogger. Here it is. Paste the below code anywhere in the head section.
<style type="text/css">
/*---- Night Mode/Dark Mode Feature - By TwistBlogg.com ----*/
.modedark {
    background: linear-gradient(to right, #eb3349 40%, #f45c43); //Background color of icon
    float: left;
    position: fixed;
    bottom: 0;             //Change this for position
    z-index: 999;
    opacity:0.7            //Opacity Degree Of Icon
}

.modedark svg {
    width: 24px;
    height: 24px;
    vertical-align: -5px;
    background-repeat: no-repeat!important;
    content: ''
}

.modedark svg path {
    fill: #fff
}

.modedark .check:checked~.NavMenu {
    opacity: 1;
    visibility: visible;
    top: 45px;
    min-width: 200px;
    transition: all .3s ease;
    z-index: 2
}

.iconmode {
    cursor: pointer;
    display: block;
    padding: 8px;
    background-position: center;
    transition: all .5s linear
}

.iconmode:hover {
    border-radius: 100px;
    background: rgba(0, 0, 0, .2) radial-gradient(circle, transparent 2%, rgba(0, 0, 0, .2) 2%) center/15000%
}

.check {
    display: none
}

.modedark .iconmode .openmode {
    display: block
}

.modedark .iconmode .closemode {
    display: none
}

.modedark .check:checked~.iconmode .openmode {
    display: none
}

.modedark .check:checked~.iconmode .closemode {
    display: block
}

/*----- Start adding Elements From here -----*/
// Below are some samples only
// Start with .nightmode followed by element(class or id) {their_properties}
.nightmode{background:#15202B;color:rgba(255,255,255,.7)}
.nightmode #outer-wrapper,.nightmode #sidebar-wrapper{background:#323232;color:#fff!important}

/* ---   Add More Elements --- */
</style>
You need to find element ids or classes in order for this to work. Add each element in the following way:
.nightmode (element class or id here) {CSS Properties}
Here are some sample classes and ids that works in most of the templates:
.nightmode .header-menu {

    background: #2B2B2B;

    color: #fff!important

}


.nightmode .header-menu a,

.nightmode .header-menu span {

    color: #EEEEEE!important

}


.nightmode #outer-wrapper,

.nightmode #sidebar-wrapper {

    background: #323232;

    color: #fff!important

}


.nightmode #PopularPosts1,

.nightmode #Label3,

.nightmode #Label1 {

    background: #323232;

}


.nightmode #PopularPosts1 a,

.nightmode #PopularPosts1 .title,

.nightmode #Label1 a,

.nightmode #Label3 a,

.nightmode #Label1 .title,

.nightmode #Label3 .title  {

    color: #eeeeee!important

}


.nightmode .post-body h1,

.nightmode .post-body h2,

.nightmode .post-body h3,

.nightmode .post-body h4,

.nightmode .post-title,

.nightmode .index-post .post-info > h2 > a {

    color: #fff!important

}
How to find out my blog elements ids and classes?
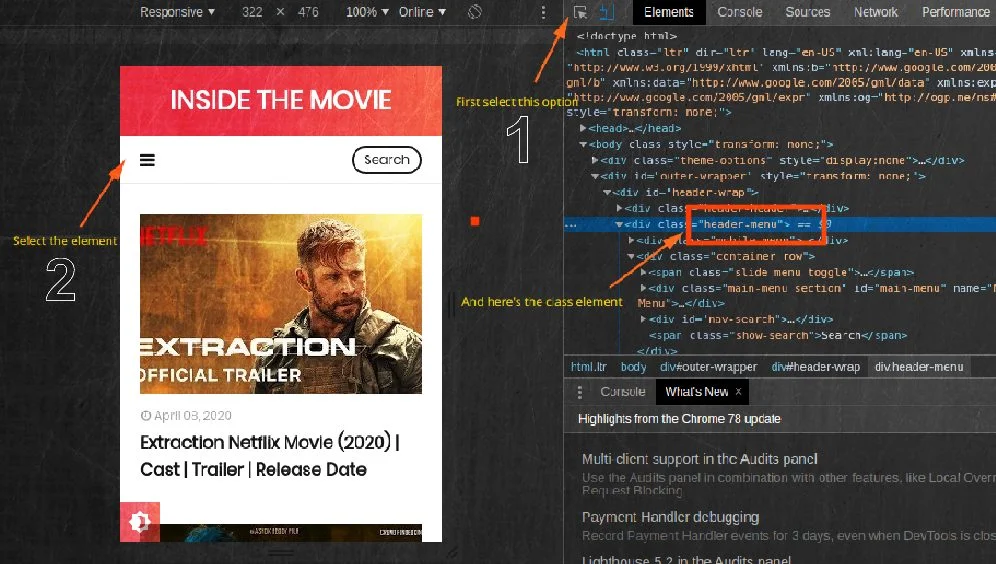
There's an easy way to figure your blog element attributes -- use Inspect Element feature present in your browser. Open your website, right click anywhere in free space and select Inspect Element option.
Ok, here's a sample from one of my recent client's website (Inside The Movie) where I added this dark mode feature. I'll be using Google Chrome for this.

So the code for above element will be :
.nightmode .header-menu { CSS_Properties here }
That's all folks. You have successfully added night mode or dark mode feature in your blogger blog. In case, you are not able to figure out the IDs or classes, contact me, I'll try my best to help you out.

