Blogger users were gifted back in 2013 when official Blogger Contact form widget was introduced along with other awesome features in blogger dashboard.
We got a huge pain relief from using other third party contact form widgets.
Soon after it was released, many awesome developers customized it with their CSS abilities and gave it a new fresh look on their blogs and offered the same for other blogger users.
Every other blogger has his/her own choices and many did not like it to appear into sidebar or footer as a gadget but they wanted it to install into a separate page of blogger like as WordPress.
I have also written a detailed post on it about How to Add Blogger Contact Form to Separate Page on Blogger. You'll find it a complete step by step guide if it is the first time you're using this contact form widget on a separate page of your blog. You'll find all other major questions answered in my previous article regarding blogger contact form not working.
1) Fully Responsive Design
2) Designed with pure CSS
3) FontAwesome Icons Integration
4) Professional Looking
5) Center Screen
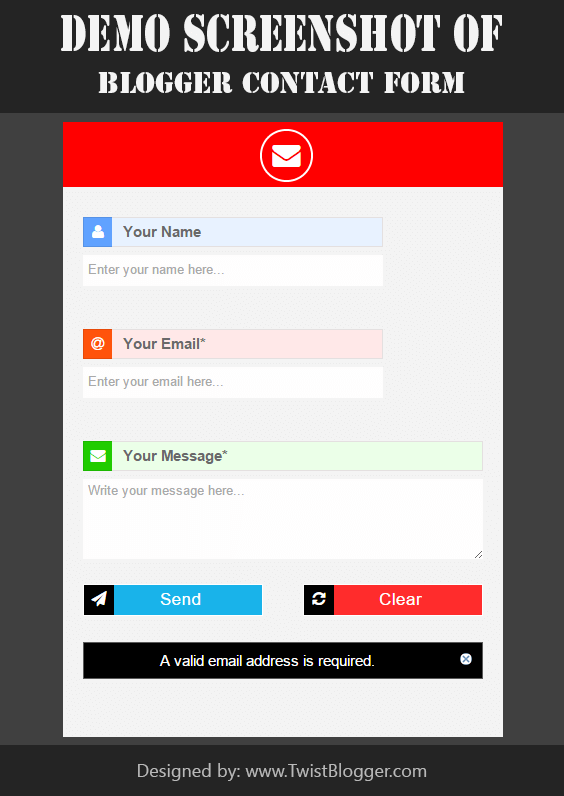
So I hope you guys would love to use it on your blogs. Below is the Demo Screenshot of it and for Live demo, just visit my contact page here.
We got a huge pain relief from using other third party contact form widgets.
Soon after it was released, many awesome developers customized it with their CSS abilities and gave it a new fresh look on their blogs and offered the same for other blogger users.
I have also written a detailed post on it about How to Add Blogger Contact Form to Separate Page on Blogger. You'll find it a complete step by step guide if it is the first time you're using this contact form widget on a separate page of your blog. You'll find all other major questions answered in my previous article regarding blogger contact form not working.
So what is so special in today's article you ask?
Well, in my previous article about it, I had customized this form but it was not a pro version at all. But when I looked into my posts area then I got to know that this is one of the most visited articles on my blog.
Then I thought to re-design it from scratch again and make it Professional Looking contact form widget.
All in all, I am happy with the final design and before making it a final copy, I asked my best buddies for their Feedback on its design from time to time. I changed it accordingly many times until they marked it a Professional looking. :)
Update 1:
Update 2:
Features of new contact form widget design:
1) Fully Responsive Design
2) Designed with pure CSS
3) FontAwesome Icons Integration
4) Professional Looking
5) Center Screen
So I hope you guys would love to use it on your blogs. Below is the Demo Screenshot of it and for Live demo, just visit my contact page here.

Did you like the above design? Can we call it a professional version? If yes then here is how to use it on your own blog now. :)
I always share my widgets with everyone and use the same on my blog, No partiality! Except the Template itself. :) But I am working on it and soon I'll release my first blogger template too (hopefully better then my own).
Adding Blogger Contact Form To A Separate Page
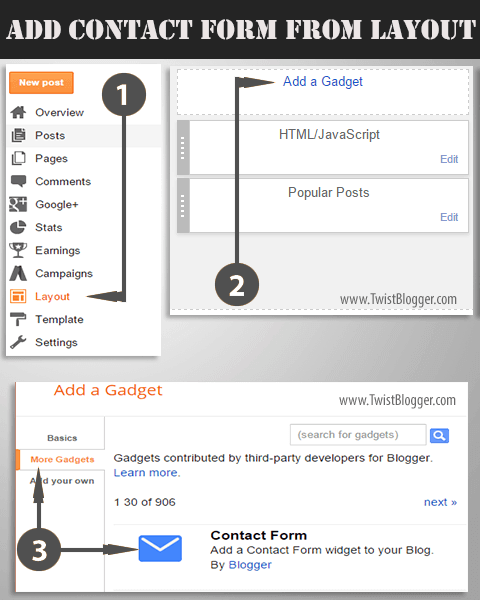
Step 1) This step is for those who have not installed the blogger Contact form widget from Blogger Library first. I hope you're already logged into your blogger account so now head over to Layout area of your blog and click on Add a Gadget link into sidebar or footer.
Now click on More Gadgets link and add the contact form from there. See the screenshot below for step by step procedure.

Step 2) After adding the contact form into sidebar, now we will hide it from appearing as a gadget so now just head over to Template section of your blog then click on Edit HTML button. After that just find out this code line
]]></b:skin>
and just before that code line, paste the CSS code given below as it is.div#ContactForm1 {
display: none !important;
}
As you know that we are using the FontAwesome Icons and if you're not using them already on your blog, then you got to install them first otherwise those icons will not appear as shown in the demo screenshot above.
Recommended: Add Stylish Sitemap Page to Blogger Blog
Recommended: Add Stylish Sitemap Page to Blogger Blog
Step 3) To add the FontAwesome icons in your template, just find out this opening tag
<head>
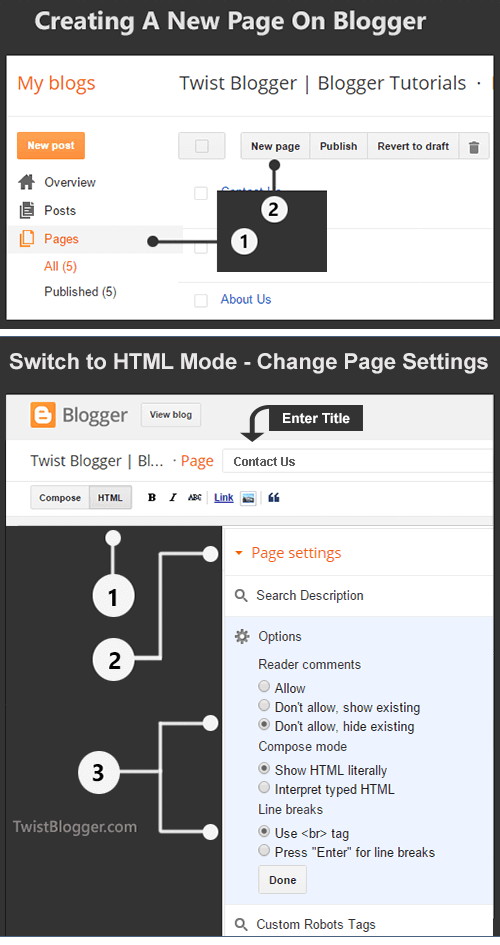
(found in the beginning part of your template code) and just below that, paste the FontAwesome icons' CSS link given below as it is.<link href='http://netdna.bootstrapcdn.com/font-awesome/4.4.0/css/font-awesome.css' rel='stylesheet'/>Step 4) Now we will add the contact form to a separate page of our blog. If you already have a separate page for contact form and using a contact form already then you need not to create a new page. But if this is the first time then got to Pages link and on top, click on New Page link.
Note:- When blogger post editor is loaded then immediately before doing anything else, just enter your page name in the title box as Contact Us. This is the most important step because you'll get the same permalink address for your new page.
You'll not be able to edit your permalink in anyway later.
If you skipped this and entered the codes first then you'll get a weird permalink address for contact us page.
After that Switch to HTML Mode and change the page settings from left side as shown in the screenshot below.

Step 5) You're almost done by now and all you need is simple Copy and Paste the code. So just select the whole CSS and HTML code given below and paste into HTML Editor as it is.
(Important Note:- You don't have permission to copy and share my codes on your blog in any way. Respect the hard work of others'. I have put a lot of efforts into designing it and you can see that by looking at the CSS Code itself)
CSS Part:-
HTML Part:-
Now just hit Publish button buddy. Finished? We did it! Yay! :) Now just visit your contact us page and see it live yourself. I hope it was a super easy to follow tut and I made clear all the things.
Still if you have some problems then please let me know, I'll help you for sure. I hope you guys liked this new look of blogger contact us form widget in a separate page of your blog.
Recommended:- How to Create Landing Pages on Blogger
If you have little time then you may share this article. :)
Thanks and Stay Blessed!
If you skipped this and entered the codes first then you'll get a weird permalink address for contact us page.
After that Switch to HTML Mode and change the page settings from left side as shown in the screenshot below.

Step 5) You're almost done by now and all you need is simple Copy and Paste the code. So just select the whole CSS and HTML code given below and paste into HTML Editor as it is.
(Important Note:- You don't have permission to copy and share my codes on your blog in any way. Respect the hard work of others'. I have put a lot of efforts into designing it and you can see that by looking at the CSS Code itself)
CSS Part:-
<style>
/****** Contact Form Designed by TwistBlogg.Com ******/
div#twist_blogger_cntct_form {
    padding: 50px 0px;
    border-radius: 2px;
    color: #1D1D1D;
    font-size: 15px;
    font-weight: bold;
    position: relative;
    background-color: #404040;
    font-family: sans-serif;
}
div#twist_blogger_cntct_form .wrap-me {
    margin: 0 auto;
    display: block;
    padding: 30px 20px;
    background-color: #F3F3F3;
    max-width: 440px;
    width: 100% !important;
    border-top: 65px solid #FF0000;
    box-sizing: border-box;
}
div#twist_blogger_cntct_form .wrap-me:before {
    content: '\f0e0';
    position: absolute;
    font-family: FontAwesome;
    font-weight: normal;
    margin-top: -88px;
    margin-left: -23px;
    left: 50%;
    display: inline-block;
    font-size: 28px;
    width: 53px;
    height: 53px;
    border-radius: 50px;
    text-align: center;
    color: #FFFFFF;
    box-sizing: border-box;
    border: 2px solid #FFFFFF;
    line-height: 49px;
}
input#ContactForm1_contact-form-name, #ContactForm1_contact-form-email, #ContactForm1_contact-form-email:hover, #ContactForm1_contact-form-email:active {
    padding: 5px;
    margin-top: 4px !important;
    box-shadow: none!Important;
    max-width: 300px;
    width: 100%;
    border: 1px solid #D2D2D2;
    line-height: 1em;
    min-height: 31px;
    background: #FEFEFE;
    font-family: sans-serif;
    margin-bottom: 15px;
    border-radius: 0px;
}
.contact-form-email-message, .contact-form-email-message:active, .contact-form-email-message:hover {
    padding: 5px;
    margin-top: 4px !important;
    box-shadow: none!Important;
    max-width: 400px;
    width: 100%;
    border: 1px solid #D2D2D2;
    line-height: 1em;
    min-height: 80px;
    background: #FEFEFE;
    font-family: sans-serif;
    margin-bottom: 10px;
    border-radius: 0px;
}
/***** Focus *****/
#ContactForm1_contact-form-name:focus, #ContactForm1_contact-form-email:focus, #ContactForm1_contact-form-email-message:focus {
    outline: none;
    background: #FFFFFF !important;
    color: #444;
    border-color: rgb(236, 235, 235) !important;
    box-shadow: 0 0 5px rgba(241, 241, 241, 0.7) !important;
    transition: all 0.3s ease-in-out !important;
}
/**** Submit button style ****/
.contact-form-button-submit:hover {
    color: #FFFFFF;
    background: #0083FF !important;
}
.contact-form-button-submit {
    background: #19B3EA;
    display: table;
    font-size: 17px;
    margin: 0 !important;
    border-radius: 0 !important;
    max-width: 100%;
    width: 100%;
    min-width: 100%;
    height: 32px;
    line-height: 0.5em;
    letter-spacing: 0.5px;
    font-family: sans-serif;
    font-weight: normal;
    cursor: pointer;
    outline: none!important;
    color: #FFFFFF;
    border: 1px solid #fff !important;
    text-align: center;
    padding: 0px 0px 0px 15px;
    text-transform: capitalize;
    transition: all 300ms ease-in-out;
    -webkit-transition: all 300ms ease-in-out;
    -moz-transition: all 300ms ease-in-out;
}
/**** Submit button on Focus ****/
.contact-form-button-submit:focus, .contact-form-button-submit.focus {
  border-color: #FFFFFF;
  box-shadow: none !important;
}
/**** Error message ****/
.contact-form-error-message-with-border .contact-form-success-message {
  background: #f9edbe;
  border: 1px solid #f0c36d;
  bottom: 0;
  box-shadow: 0 2px 4px rgba(0,0,0,.2);
  color: #666;
  font-size: 12px;
  font-weight: bold;
  padding-bottom: 10px;
  line-height: 19px;
  margin-left: 0;
  opacity: 1;
  position: static;
  text-align: center;
}
/**** Submit Button On Success Message ****/
.contact-form-button-submit.disabled, .contact-form-button-submit.disabled:hover, .contact-form-button-submit.disabled:active {
    opacity: 0.9;
}
/****** Success Message *****/
.contact-form-error-message-with-border {
    background: #000000;
    border: 1px solid #5A5A5A;
    bottom: 0;
    box-shadow: none;
    color: #FDFDFD;
    font-size: 15px;
    font-weight: normal;
    line-height: 35px;
    margin-left: 0;
    opacity: 1;
    position: static;
    text-align: center;
    height: 35px;
    margin-top: 45px;
}
.contact-form-cross {
    height: 14px;
    margin: 5px;
    vertical-align: -8.5%;
    float: right;
    width: 14px;
    border-radius: 50px;
    border: 0 !important;
    cursor: pointer;
}
.contact-form-success-message-with-border {
    font-weight: normal;
    background-color: #000;
    border: 1px solid #FFF;
    color: #FFF;
    line-height: 35px;
    margin-left: 0;
    font-size: 13px;
    opacity: 1;
    position: static;
    text-align: center;
    height: 35px;
    margin-top: 45px;
}
/* Extra Stuff */
div#twist_blogger_cntct_form span.name-bg {
    background-color: #E8F2FF;
 }
div#twist_blogger_cntct_form span.email-bg {
    background-color: #FFE8E8;
}
div#twist_blogger_cntct_form span.name-bg, div#twist_blogger_cntct_form span.email-bg {
    display: inline-block;
    max-width: 300px;
    line-height: 21px;
    width: 100%;
    color: #696969;
    padding: 3px 5px;
    margin: 0px 0px 4px;
    box-sizing: border-box;
    height: 30px;
    border: 1px solid #E4E0E0;
    padding-left: 39px;
}
div#twist_blogger_cntct_form span.name-bg:before {
    content: '\f007';
    background-color: #60A2FF;
 }
div#twist_blogger_cntct_form span.email-bg:before {
    content: '\f1fa ';
    background-color: #FF530B;
}
div#twist_blogger_cntct_form span.name-bg:before, div#twist_blogger_cntct_form span.email-bg:before, div#twist_blogger_cntct_form span.message-bg:before {
    font-family: FontAwesome;
    text-align: center;
    margin: -4px 0 0px 0px;
    font-weight: normal;
    padding: 0;
    line-height: 27px;
    width: 28px;
    height: 28px;
    display: table;
    position: absolute;
    margin-left: -40px !important;
    border: 1px solid rgba(0, 0, 0, 0.1);
    border-right: 0 !important;
    color: #FFFFFF;
}
div#twist_blogger_cntct_form span.message-bg {
    background-color: #EBFFE8;
    display: inline-block;
    max-width: 400px;
    line-height: 21px;
    width: 100%;
    color: #696969;
    padding: 3px 5px;
    box-sizing: border-box;
    height: 30px;
    border: 1px solid #E4E0E0;
    padding-left: 39px;
    margin: 0px 0px 4px;
}
div#twist_blogger_cntct_form span.message-bg:before {
    content: '\f0e0';
    background-color: #20CC00;
}
div#twist_blogger_cntct_form span.send-bg {
    height: 32px;
    display: inline-block;
    float: left;
    max-width: 45%;
    width: 100%;
    margin-top: 15px;
    transition: all 0.4s ease-in-out !important;
}
div#twist_blogger_cntct_form span.send-bg:before {
    content: '\f1d8';
 }
div#twist_blogger_cntct_form span.send-bg:before, div#twist_blogger_cntct_form span.clear-bg:before {
    font-family: FontAwesome;
    text-align: center;
    font-weight: normal;
    margin: 0;
    background-color: #000;
    padding: 0;
    line-height: 27px;
    width: 30px;
    height: 30px;
    display: inline-block;
    position: absolute;
    border: 1px solid #fff;
    border-right: 0 !important;
    color: #FFFFFF;
}
div#twist_blogger_cntct_form span.clear-bg {
    display: inline-block;
    float: right;
    margin-top: 15px;
    max-width: 45%;
    width: 100%;
}
div#twist_blogger_cntct_form span.clear-bg:before {
    content: '\f021';
 }

input.contact-form-button.contact-form-button-submit.clear-button:hover {
    background-color: #E83434 !important;
}
div#twist_blogger_cntct_form .clear-button {
    color: #FFFFFF;
    border: 1px solid #FFF !important;
    background-color: #FF2C2C;
    float: right;
    display: table;
    height: 32px;
}
</style>
HTML Part:-
<div id="twist_blogger_cntct_form">
<div class="wrap-me">
<form name="contact-form">
<span class='name-bg'>Your Name</span><br />
<input class="contact-form-name" id="ContactForm1_contact-form-name" name="name" placeholder="Enter your name here..." size="30" type="text" value="" /><br />
<br />
<span class='email-bg'>Your Email*</span><br />
<input class="contact-form-email" id="ContactForm1_contact-form-email" name="email" placeholder="Enter your email here..." size="30" type="text" value="" /><br />
<br />
<span class='message-bg'>Your Message*</span><br />
<textarea class="contact-form-email-message" cols="25" id="ContactForm1_contact-form-email-message" name="email-message" placeholder="Write your message here..." rows="5"></textarea><br />
<span class='send-bg'><input class="contact-form-button contact-form-button-submit" id="ContactForm1_contact-form-submit" type="button" value="Send" /></span>
<span class='clear-bg'><input class='contact-form-button contact-form-button-submit clear-button' type='reset' value='Clear'/></span>
<br />
<div style="max-width: 100%; text-align: center; width: 100%;">
<div class="contact-form-error-message" id="ContactForm1_contact-form-error-message">
</div>
<div class="contact-form-success-message" id="ContactForm1_contact-form-success-message">
</div>
</div>
</form>
<br />
</div>
</div>
Now just hit Publish button buddy. Finished? We did it! Yay! :) Now just visit your contact us page and see it live yourself. I hope it was a super easy to follow tut and I made clear all the things.
Still if you have some problems then please let me know, I'll help you for sure. I hope you guys liked this new look of blogger contact us form widget in a separate page of your blog.
Recommended:- How to Create Landing Pages on Blogger
If you have little time then you may share this article. :)
Thanks and Stay Blessed!

![Design A Professional Contact Page For Blogger [Stylish] - TwistBlogg - Premium Blogger Tutorials and Widgets](https://blogger.googleusercontent.com/img/b/R29vZ2xl/AVvXsEiAh1wmYwrm6p02dX15i_FWL-rpRN_lZzMFqoh_ujbdbdszrGfs4XW922v1qi2w2tBftHqiKAXxS2IYl3JWCiYOuXbleslQCMvQmLcrxVNQ7pvNFMAz6FYmncEk5faBGHGBFHBP40qy772s/w0/stylish+blogger+contact+page.jpg)
