So I came up with another version of sidebar subscription box widget for blogger which is more elegant than the previous version of this widget, just evolving by the time. :)
Previously designed subscription box widget was an average just because I had used some out of box type settings and you had to customize it's settings in CSS to make it look like as it was shown in the screenshot.
But this time it is super easy to customize and you need not to play with the CSS part except changing the color codes which is a super easy task, anyone can do it.
Key Features Of This Subscription Box Widget
1) Fully Responsive Design.2) Super easy to customize the colors and text content.
3) Social Profiles' Links in the bottom.
4) Use of Font Awesome icons with beautiful hover effect.
5) Made with pure CSS and HTML so it loads very fast.
6) Needs not to mention but it is stylish. :)

NOTE:- You do not have permission to COPY and SHARE my code on your blog. Neither you can remove the Credits given in the CSS comments. CSS comments do not appear on your blog. Neither they provide me any backlink nor they affect your blog in anyway so keep them intact. Respect the hard-work of others'. Play it safe and clean. :)
*BONUS:- I have included a backlink in the bottom of subscription box and you can remove it simply from the HTML part if you wish to. Choice is yours! My blogger widgets are always neat and clean, just all what you need.
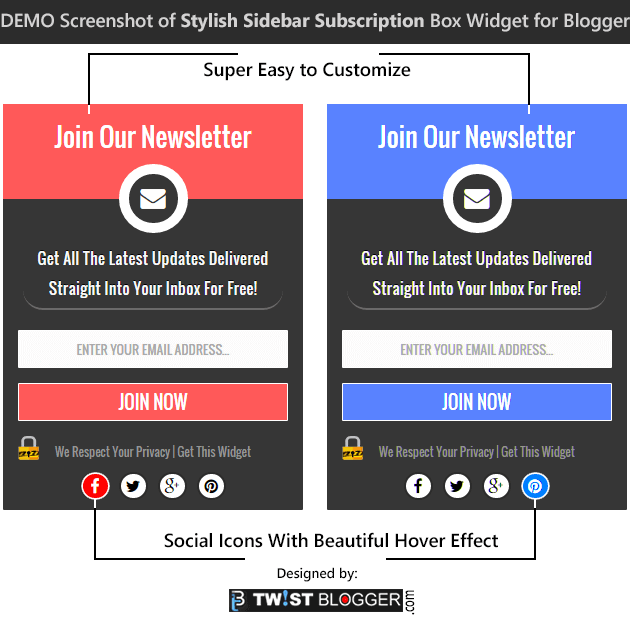
So here we go with the Demo Screenshot of our new stylish subscription box widget, see below.

So did you like this widget? Here is how to install it into your template step by step.
Installing Sidebar Subscription Box Widget to Blogger Template
First of all we need to add the Font Awesome icons' CSS Stylesheet link to our blog in case you are not using it already.Step 1) Logged into your blogger account? Now select your Blog > go to Template Section > Click on Edit HTML. Now let the template code box load.
Step 2) Now click anywhere inside the template code box and press Ctrl+F to open a search box inside. Now find out this opening
<head> tag and just below it, paste the Font Awesome icon's link given below as it is.<link href='http://netdna.bootstrapcdn.com/font-awesome/4.3.0/css/font-awesome.css' rel='stylesheet'/>Recommended: Stylish Horizontal Email Subscription Box For Blogger
Step 3) Now save your Template code and go to Layout Area of your blog. This time click on "Add a gadget" link in the sidebar and add a HTML/JavaScript widget. Now paste the whole CSS and HTML code given below after making required changes given just below the code in editing step.
<style>
/* ----------------------------------------------------
Sidebar Subscription Box Widget = V.2
Designed by :: https://www.twistBlogg.com
Keep These Credits Intact, Do Not Remove
-----------------------------------------------------*/
#twist-blogger-sbox-v2 {
  padding: 0;
  padding-bottom: 5px;
  font-family: inherit;
  display: block;
  margin: 0;
  width: 100%;
  border-radius: 1px;
  border: 0;
  background: #363636;
}
#twist-blogger-sbox-v2 .main_tagline {
  padding: 0px 0px;
  line-height: 2.5em;
  font-size: 26px;
  margin: 0;
  height: 95px !important;
  overflow: hidden;
  font-weight: normal;
  color: #FFF;
  text-align: center;
  border: 0;
  background-color: #FF5959;
}
#twist-blogger-sbox-v2 .email_icon {
  display: table;
  margin: -35px auto 0px;
  font-size: 25px;
  padding: 12px;
  height: 25px;
  width: 25px;
  background-color: #363636;
  color: #FFF;
  border-radius: 50px;
  border: 10px solid #FFFFFF;
  line-height: 0;
}
#twist-blogger-sbox-v2 p {
  font-size: 15px;
  color: #F9F9F9;
  text-shadow: 0px -1px 0px #000;
  line-height: 27px;
  padding: 5px 10px 5px;
  text-align: center;
  width: 80%;
  margin: 5px auto 20px;
  border-bottom: 2px solid #6A6A6A;
  border-radius: 20px;
}
#twist-blogger-sbox-v2 .rssform {
  padding: 0;
  margin: 0 auto;
  display: block;
}
#twist-blogger-sbox-v2 .rssform input {
  padding: 8px;
  margin: 20px auto 15px;
  font-size: 13px;
  color: #000;
  text-align: center;
  display: block;
  font-family: inherit;
  font-weight: normal;
  width: 90%;
  height: 38px;
  text-transform: uppercase;
  outline: none !important;
  border: 1px solid #FFFFFF;
  border-radius: 1px;
  background-color: #FCFCFC;
  box-sizing: border-box !important;
}
#twist-blogger-sbox-v2 .rssform .button:hover {
  background: #000000;
}
#twist-blogger-sbox-v2 .rssform .button {
  background: #FF5959;
  color: white!important;
  border: 1px solid #FFFFFF;
  margin-top: 15px;
  outline: none !important;
  transition: all .3s ease-in-out;
  padding: 5px 2px !important;
  float: none;
  text-transform: uppercase;
  font-size: 18px;
  font-weight: normal;
  cursor: pointer;
}
#twist-blogger-sbox-v2 .bottom_lock_policy {
  background: url(https://blogger.googleusercontent.com/img/b/R29vZ2xl/AVvXsEjrJml5xs8AHuZ7uIfXX9D5S1lvb6wm_7iohyphenhyphenZXWf_HIln9TZNrgm-mQqABSesTQfcdS3W27suRfFzYYlwmAbkDF36QZIl46iIvF_Ezc_cxt0B-0y75FoqFfRPqoo4wCiu9GF1nnhA2Oxs/s1600/Lock-twistblogger.png) no-repeat 3% -2px;
  color: #959595;
  text-align: center;
  font-size: 12px;
  margin: 0;
  padding: 3px;
  line-height: 25px;
}
#twist-blogger-sbox-v2 .bottom_lock_policy a {
  color: #959595;
  text-decoration: none !Important;
}
#twist-blogger-sbox-v2 .social_profiles {
  line-height: 1.2em;
  display: table;
  float: none;
  margin: 0px auto;
  text-align: center;
  min-width: 157px;
  padding: 5px 0px;
  border: 0;
}
#twist-blogger-sbox-v2 .social_profiles a:hover {
  color: #FFF;
  background-color: #FF5959;
  border-color: #FFF;
}
#twist-blogger-sbox-v2 .social_profiles a {
  color: #000000;
  margin: 0 5px;
  text-align: center;
  float: left;
  display: table;
  padding: 4px 5px;
  background-color: #FFFFFF;
  border-radius: 50px;
  border: 2px solid #2D2D2D;
  width: 15px;
  height: 15px;
  line-height: 0;
  font-size: 16px;
  transition: all 0.3s ease-in-out;
  -webkit-transition: all 0.3s ease-in-out;
}
#twist-blogger-sbox-v2 form {
  margin-bottom: 10px !important;
}
</style>
<div id="twist-blogger-sbox-v2">
            <div class="main_tagline">Join Our Newsletter</div><div class="email_icon"><i class="fa fa-envelope"></i></div>
                 <p>Get All The Latest Updates Delivered Straight Into Your Inbox For Free!</p>
   <div class="rssform">
            <form action="http://feedburner.google.com/fb/a/mailverify" method="post" target="popupwindow" onsubmit="window.open('http://feedburner.google.com/fb/a/mailverify?uri=TwistBlogg', 'popupwindow', 'scrollbars=yes,width=550,height=520');return true">
            <input type="text" name="email" placeholder="Enter your email address...">
            <input type="hidden" value="TwistBlogg" name="uri">
            <input type="hidden" name="loc" value="en_US">
            <input value="Join Now" class="button" type="submit">
            </form>
            </div>
      <div class="bottom_lock_policy">We Respect Your Privacy | <a href="http://twistblogg.blogspot.com/2015/07/new-stylish-sidebar-subscription-box-widget-for-blogger.html">Get This Widget</a>   </div>
   <div class="social_profiles">
   <a href="http://www.facebook.com/uzzy.tech" target='_blank' rel='nofollow' title="Join on Facebook"><i class="fa fa-facebook"></i></a>
   <a href="http://www.twitter.com/softsyard" target='_blank' rel='nofollow' title="Follow on Twitter"><i class="fa fa-twitter"></i></a>
   <a href="http://plus.google.com/+InvictusHaxor" target='_blank' rel='nofollow' title="Follow on Google+"><i class="fa fa-google-plus"></i></a>
   <a href="http://www.pinterst.com/invictushaxor" target='_blank' rel='nofollow' title="Follow on Pinterest"><i class="fa fa-pinterest"></i></a>
   </div>
            </div>
Editing:-
1) Changing the color scheme
For changing the default color, just find out this color code
#FF5959 and replace it with the color code of your choice. Please note that you'll find this code three times in the above CSS so just replace it three times with the same color code of your choice. Be careful with the text color too because white text may not appear properly in some colors so just change the text color too.2) Changing Main Headlines
They are highlighted in the very beginning of above HTML code so change those all if you wish to or let them as it is.
3) Changing FeedBurner Address
This is the important step so change my feedburner address
TwistBlogg which is highlighted two times in the HTML. Replace mine with yours two times.4) Removing the Backlink
My backlink to this post is provided in the above code, so remove it or keep it. :)
<a href="http://twistblogg.blogspot.com/2015/07/new-stylish-sidebar-subscription-box-widget-for-blogger.html">Get This Widget</a>
5) Final step is just to remove my Social Profile Links and add yours. These links are at the bottom of HTML so replace them with yours.
Finally save your HTML/JavaScript widget and visit your blog to check if it is working.
*Available Now : Premium WordPress Like Email Subscription Box For Blogger*
If anyhow something goes wrong or your did not understand what to change or anything else, just hit me back and I am there to support you with the complete installation process or I'll do it for you.
This is all in this post and now I am working on a Landing page template (simple) to which you can use to promote some Affiliate products. Hopefully I'll share it in a few days so stay tuned if you wish to use it. :) If you want to create a landing page on your existing blog then just follow this ultimate guide to create Squeeze Pages or landing pages on blogger.
Now you can help me by sharing this post on at least one social media platform of your choice, your support is all I need to keep going. Connect with me on Facebook by liking my page or adding me on Google plus or by following on twitter. Stay Blessed!
