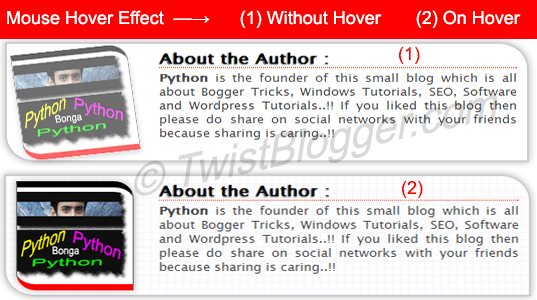
Today we are sharing a nice stylish author box widget which will appear below every post in your blogger blog. In this Author box, the Author image will have a nice mouse hover effect. Let us begin with process of its installation.

*** New Version Available - Add Responsive Author box With Social Icons Below Posts ***
Screenshot of Stylish Author Box
Below are the two combined screenshots of our author box widget showing its mouse hover effect.

*** New Version Available - Add Responsive Author box With Social Icons Below Posts ***
How To Add Author Box Below Posts In Blogger
Step 1) As you know we have to insert some codes into our template so go to Blogger → Template → Edit Html. After that you need to search a code line
<head> and right after that line just paste the little piece of code given below.
Note:- To find the
<head> or any code line easily in your template code, just click anywhere inside your template code then press Ctrl+f or Cmd+f then a search box will appear inside template code box. Copy the code line you want to find in search box and hit enter.<link href='https://amanbhattarai4400.github.io/csshosting/author-box.css' rel='stylesheet'/>
Or if you prefer using CSS inside your Template Code then below is the CSS code of Author box widget which you need to paste before
]]></b:skin> code line of your template if you don't want to use the hosted code link of CSS./* -------------Copyright: TwistBlogg.com 2018----------------*/
.tb-about{ float:left;
width:100%;
padding: 10px 10px 5px 10px;
border:2px solid #ccc;
border-radius: 0px 30px;margin-bottom:15px;
margin-top:10px;
background:url('https://blogger.googleusercontent.com/img/b/R29vZ2xl/AVvXsEh8xCnBqHh5c61G0tvuVhFUl0g9FnEuWqIxC3xOYvXhklTaVHZrz7l_yHVZ4eyY8I555cq1nfU5anotRJeeOfKif2gqYK7AX1M9zkKYt9-sKI48j1Yt2R7qO_O1TN4uNGmje9vd7AXhTsY/s1600/tbbg.png');color:#444444;
-webkit-box-shadow:0px 0px 10px rgba(0, 0, 0, .3);
-moz-box-shadow:0px 0px 10px rgba(0, 0, 0, .3);
box-shadow:0px 0px 10px rgba(0, 0, 0, .3);
text-align:justify; }
.tb p{text-align:justify;
font-family: 'Lucida Grande','Lucida Sans Unicode',Arial,Helvetica,sans-serif;
font-size: 13px;}
.tb-aboutheading h2 { color:#000;
font-family:'Lucida Grande','Lucida Sans Unicode',Arial,Helvetica,sans-serif;
font-weight:bold;
text-shadow:#64665b 0px 1px 1px;
font-size:17px;
margin-bottom:-10px; margin-top:0px;
margin-left: 142; border-bottom: 1px dotted #FF3402; }
.tb-aboutimg{ float:left; margin-right:25px; }
.tb-aboutimg img{ border-top: 7px solid #000;
border-bottom: 7px solid #F70303;
border-left: 1px solid #646461;
border-right: 1px solid #646461;
border-radius: 0px 20px; margin: 0px 0px 0px 0px;
-webkit-transition:-webkit-transform .35s linear;
-moz-transition:-moz-transform .35s linear;
-o-transition:-o-transform .35s linear;transition:transform .35s linear;
-webkit-box-shadow:0 3px 6px rgba(0,0,0,.25);
-moz-box-shadow:0 3px 6px rgba(0,0,0,.25);
box-shadow:0 3px 6px rgba(0,0,0,.25);
padding:5px 5px 5px 0px;
-webkit-transform:rotate(-7deg);
-moz-transform:rotate(-7deg);
-ms-transform:rotate(-7deg);
-o-transform:rotate(+5deg);
transform:rotate(-7deg);float:left; }
#tb-aboutimgD{opacity: 0.5; filter: alpha(opacity=80);}
#tb-aboutimgD:hover{opacity: 0.9; filter: alpha(opacity=90);}
.tb-aboutimg img:hover { -webkit-box-shadow:0px 0px 10px rgba(0, 0, 0, .3);
-moz-box-shadow:0px 0px 10px rgba(0, 0, 0, .3);
box-shadow:0px 0px 10px rgba(0, 0, 0, .3);
-webkit-transform:rotate(0deg);
-moz-transform:rotate(0deg);
-ms-transform:rotate(0deg);
-o-transform:rotate(0deg); transform:rotate(0deg); }
In above CSS code you can make changes according to your choice and we have highlighted some common things you might need to change like as background image, border radius, width or font size etc.
Step 2) After completing the step 1, find
<div class='post-footer-line post-footer-line-1'> code line in your template code and right after that paste the code given below<b:if cond='data:blog.pageType == "item"'>
<div class='tb-about'>
<div class='tb-aboutimg'>
<img id='tb-aboutimgD' alt='Author Image' height='100' src='Your Image URL' width='110'/>
</div><div class='tb-aboutheading'>
<h2 >About the Author :</h2></div><div class='tb'>
<p><b>Aman</b> is the founder of this small blog which is all about Blogger Tricks, Windows Tutorials, SEO, Software and Wordpress Tutorials..!! If you liked this blog then please do share on social networks with your friends because sharing is caring..!! <a href='http://twistblogg.blogspot.com/p/about-us.html'>Read more...</a></p></div>
</b:if>
Customizing: You need to customize this code given above so replace YOUR Image URL with the URL of your author image. To change the size of image in author box just change the values of height and width with your own values like as 150 (don't use px like as 150px with values).
Change Aman with your name and rest of text with your author bio. In above code we have also inserted a Read more link in the end of author bio which is linked to about us page so change our link with your blog's about us page where readers can read more about you and your blog. If you do not have a about us page then simply delete it.
We hope you like our author box but if you are facing any kind of problem with this widget or its not working, let us know via comments and help each other. Thank You.
We hope you like our author box but if you are facing any kind of problem with this widget or its not working, let us know via comments and help each other. Thank You.
